Deploy your custom instance to Google Cloud
This page shows you how to create a development environment in Google Cloud Platform, using Terraform. This is step 5 of the recommended workflow.
Note: It’s recommended that you go through the Quickstart to start up a local instance before attempting to set up a Google Cloud instance. This will ensure you have all the necessary prerequisites, and give you a chance to test out your own data to make sure everything is working.
- System overview
- Prerequisites
- Generate credentials for Google Cloud authentication
- One-time setup: Enable APIs
- One-time setup: Create a Google Cloud Artifact Registry repository for custom builds
- Configure and run a Terraform deployment
- Manage your data
- View your running application
- Manage your service
- Optional: Provide custom MCP instructions files
- Connect an AI agent to the MCP server
- Update your Terraform deployment
- Manage multiple Terraform deployments
System overview
Here is the Data Commons setup in Google Cloud Platform (GCP):
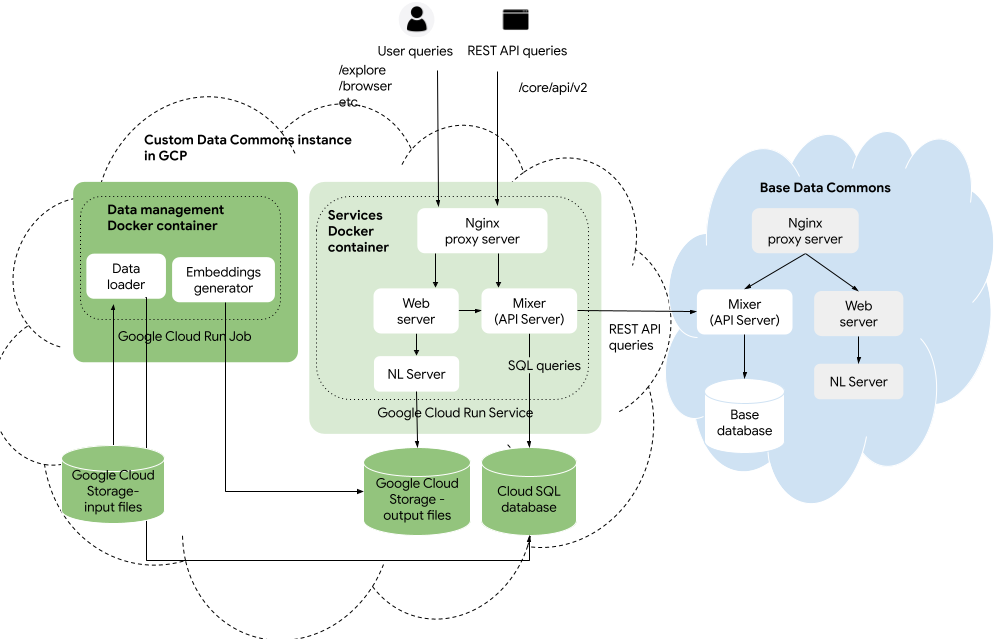
You upload your data and configuration files to Google Cloud Storage, and run the Data Commons data management Docker container as a Cloud Run job. The job will transform and store the data in a Google Cloud SQL database, and generate NL embeddings stored in Cloud Storage. The services Docker container runs as a Cloud Run service, using the Docker image stored in a Google Cloud Artifact Registry repository.
Prerequisites
- You must have a GCP billing account and project.
- You must have relevant API keys. If you haven’t obtained them yet, see One-time setup steps in the Quickstart.
-
You must have installed git (if you are running in a local environment) and cloned the https://github.com/datacommonsorg/website repo. For cloning procedures, see One-time setup steps in the Quickstart.
- Install gcloud CLI on your local machine. gcloud is required for authentication and management tasks.
- Install Terraform on your local machine. Terraform is used to automate the setup steps of all the components.
Tip: If you use Google Cloud Shell as your development environment, gcloud and Terraform come pre-installed.
Generate credentials for Google Cloud authentication
You will need to regenerate credentials on a periodic basis whenever you run gcloud or Terraform scripts. You can also adjust the frequency with which credentials must be refreshed; see https://support.google.com/a/answer/9368756 for details.
From any directory, run:
gcloud auth application-default login
This opens a browser window that prompts you to enter credentials, sign in to Google Auth Library and allow Google Auth Library to access your account. Accept the prompts. When it has completed, a credential JSON file is created in
$HOME/.config/gcloud/application_default_credentials.json. Use this in the command below to authenticate from the docker container.
The first time you run it, may be prompted to specify a quota project for billing that will be used in the credentials file. If so, run this command:
gcloud auth application-default set-quota-project PROJECT_ID
One-time setup: Enable APIs
website/deploy/terraform-custom-datacommons/setup.sh is a convenience script to set up all necessary Cloud APIs. To run it:
 cd website/deploy/terraform-custom-datacommons
 ./setup.sh PROJECT_ID
One-time setup: Create a Google Cloud Artifact Registry repository for custom builds
If you are building your own services Docker image, this is necessary. If you are only reusing the image provided by Data Commons with no customizations, you can skip this step.
website/deploy/terraform-custom-datacommons/create_artifact_repository.sh is a convenience script to create a repository in the Google Artifact Registry. The script creates a repository called PROJECT_ID-artifacts, where you store uploaded Docker images you build. You will upload a custom image in the subsequent steps.
To run it:
cd website/deploy/terraform-custom-datacommons
./create_artifact_repository.sh PROJECT_ID
The project ID may be the same project you are using for all other resources, or it may be a separate one you use for pushing releases.
To verify that the repository is created, go to https://console.cloud.google.com/artifacts for your project. You should see the repository in the list.
Configure and run a Terraform deployment
We recommend using the Data Commons Terraform scripts to greatly simplify and automate the deployment of all the required GCP services. The scripts are located at website/deploy/terraform-custom-datacommons.
Terraform provisions and runs all the necessary Cloud Platform services:
- Creates a service account for your project and namespace and assigns it various permissions (IAM roles).
- Creates a Cloud Storage bucket and top-level folder, which will store your data files. You will upload your input data in the subsequent steps.
- Creates a Cloud SQL MySQL instance, with basic resources, a default database user and a random password.
- Creates the Data Commons data management container as a Cloud Run job, with basic resources.
- Creates a single instance of the Data Commons services container as a Cloud Run service, with basic resources. By default this uses the prebuilt image provided by Data Commons team; you will change this to your custom image in subsequent steps.
- Stores all secrets (API keys and database passwords) in the Cloud Secret Manager.
- Creates a URL for accessing your service in the browser.
Follow the steps below to create and run a Terraform deployment.
Configure the Terraform deployment
- From the root directory of the
websiterepo, using your favorite editor, copydeploy/terraform-custom-datacommons/modules/terraform.tfvars.sampleand save it as a new filedeploy/terraform-custom-datacommons/modules/terraform.tfvars. - Edit the required variables to specify the relevant values. The
namespacevariable allows you uniquely identify the Data Commons deployment, in the case that you decide to set up multiple instances, e.g. development, staging, testing, production, etc. Since this is a development environment, you may want to have a suffix such as-dev.
Edit optional variables
All of the deployment options you can configure are listed in deploy/terraform-custom-datacommons/modules/variables.tf. We recommend you keep the default settings for most options at this point. However, you may want to override the following:
| Option | Default | Description |
|---|---|---|
region |
us-central1, close to the base Data Commons data |
Specifies where your services will be run and data will be served from. If you want to set this to a different value, for a list of supported regions, see Cloud SQL Manage instance locations. |
gcs_data_bucket_name |
NAMESPACE-datacommons-data-PROJECT_ID |
Cloud Storage bucket name. You can override the datacommons-data portion of the name. |
gcs_data_bucket_location |
US |
Specifies where your uploaded data is stored. |
gcs_data_bucket_input_folder |
input |
The GCS folder to which you will upload your data and config files. If you have subfolders, you create these manually. |
gcs_data_bucket_output_folder |
output |
The GCS folder where NL embeddings will be stored. |
mysql_instance_name |
NAMESPACE-datacommons-mysql-instance |
Cloud SQL instance name. You can override the datacommons-mysql-instance portion of the name. |
mysql_database_name |
datacommons |
The MySQL database managed by Cloud SQL. |
mysql_user |
datacommons |
The default user of the MySQL database. |
dc_web_service_image |
gcr.io/datcom-ci/datacommons-services:stable |
Specifies the image for the Docker services container. You will want to change this to a custom image once you have created it in Upload a custom Docker image. |
make_dc_web_service_public |
true |
If you intend to restrict access to your instance, set this to false. |
disable_google_maps |
false |
If you want to disable showing Google Maps in the website, set this to true. |
enable_mcp |
true |
If you want to disable the MCP server from running, set this to false. |
Other recommended settings for a production environment are provided in Launch your Data Commons.
To customize any option, do not edit in place in variables.tf. Instead, add the variable to the terraform.tfvars file and set it to the desired value. For example, if you wanted to set the region variable to us-east1, specify it as follows:
region = "us-east1"
Run the Terraform deployment
- Open a terminal and navigate to the
website/deploy/terraform-custom-datacommons/modulesdirectory. -
Initialize Terraform and validate the configuration:
terraform init terraform plan - Review the plan for any possible configuration errors and fix them if needed.
-
Deploy the instance:
terraform apply - At the prompt asking you to confirm the actions before creating resources, type
yesto proceed. It will take about 15 minutes to complete. You will see extensive output showing the progress of the deployment. You may want to take note of the names of the various services created. - To view the running application, which initially just serves the default “Custom Data Commons” UI with the base data, open the browser link listed in the
cloud_run_service_urloutput, or see View the running application for more details. To run the application with your own data and/or custom build, continue with the rest of this page.
Manage your data
Upload data files to Google Cloud Storage
Note: Before proceeding, make sure your data is in the correct format required by Data Commons, and you’ve written an accompanying config file. Please see Prepare and load your own data for complete details.
By default, the Terraform scripts create a Cloud Storage bucket called NAMESPACE-datacommons-data-PROJECT_ID, with a top-level folder input. You upload your CSV, JSON, and MCF files to this folder. You can create subfolders of input, but remember to set "includeInputSubdirs": true in config.json.
As you are iterating on changes to the files, you can re-upload them at any time, either overwriting existing files or creating new folders. If you want versioned snapshots, you can create new folders to store them. A simple strategy would be to move the older versions to other folders, and keep the latest versions in input, to avoid having to update configuration variables. If you prefer to simply incrementally update, you can simply overwrite files. Creating new versions of files is slower but safer. Overwriting files is faster but riskier.
To upload data files:
- Cloud Console
- gcloud CLI
- Go to https://console.cloud.google.com/storage/browse for your service and select the Data Commons bucket that was created by the Terraform script.
- Select the input folder.
- Click Upload Files, and select the CSV files, MCF files, and
config.jsonfrom your local file system.
- Navigate to your local "input" directory where your source files are located.
- Run the following command:
gcloud storage cp config.json [PATH/]*.csv [PATH/]*.mcf gs://BUCKET_NAME/input
The path names are only required if you are using subdirectories to store your files.
Note: Do not upload the local
datacommonssubdirectory or its files.
Once you have uploaded the new data, you must rerun the data management Cloud Run job and restart the services Cloud Run service.
Run the data management container
By default, the Terraform scripts create and run a Google Run job called NAMESPACE-datacommons-data-job. When you run the data management job, it converts CSV (and MCF) data into tables in the Cloud SQL database and generates embeddings in the output folder of the Cloud Storage bucket.
Every time you upload new input files to Google Cloud Storage, you will need to rerun the job. You can simply run terraform apply again, or use any of the other methods described below.
- Cloud Console
- gcloud CLI
- Go to https://console.cloud.google.com/run/jobs for your project.
- From the list of jobs, select the job created by the Terraform script.
- Click Execute. It will take several minutes for the job to run.
From any local directory, run the following command:
gcloud run jobs execute JOB_NAME --region REGION
When it completes, to verify that the data has been loaded correctly, see Inspect the Cloud SQL database. Then restart the services Cloud Run service.
(Optional) Run the data management Cloud Run job in schema update mode
If you have tried to start a container, and have received a SQL check failed error, this indicates that a database schema update is needed. You need to restart the data management container, and you can specify an additional, optional, flag, DATA_RUN_MODE=schemaupdate. This mode updates the database schema without re-importing data or re-building natural language embeddings. This is the quickest way to resolve a SQL check failed error during services container startup.
- Cloud Console
- gcloud CLI
- Go to https://console.cloud.google.com/run/jobs for your project.
- From the list of jobs, select the job created by the Terraform script.
- Select Execute > Execute with overrides and click Add variable to set a new variable with name
DATA_RUN_MODEand valueschemaupdate. - Click Execute. It will take several minutes for the job to run.
From any local directory, run the following command:
gcloud run jobs execute JOB_NAME --update-env-vars DATA_RUN_MODE=schemaupdate --region REGION
Inspect the Cloud SQL database
By default, the Terraform scripts create a Cloud SQL instance called PROJECT_ID:us-central1:NAMESPACE-datacommons-mysql-instance, with a database named datacommons, and a default user with admin permissions called datacommons.
Before you can inspect the database, you need to retrieve the password created by the Terraform scripts:
- Go to https://console.cloud.google.com/security/secret-manager for your project and in the list of secrets, select
NAMESPACE-datacommons-mysql-password. - Click the Versions tab, and select Actions > View secret value. Record the password.
To view the tables:
- Go to https://console.cloud.google.com/sql/instances for your project.
- Select the instance created by the Terraform script.
- In the left panel, select Cloud SQL Studio.
- In the Sign in to SQL Studio page, from the Database field, select the database created by the Terraform script.
- In the User field, select the user created by the Terraform script.
- In the Password field, enter the password you have retrieved from the Cloud Secret Manager.
- In the left Explorer pane that appears, expand the Databases icon, your database name, and Tables. The table of interest is observations. You can see column names and other metadata.
- To view the actual data, in the main window, click New SQL Editor tab. This opens an environment in which you can enter and run SQL queries.
-
Enter a query and click Run. For example, for the sample OECD data, if you do
select * from observations limit 10;, you should see output like this: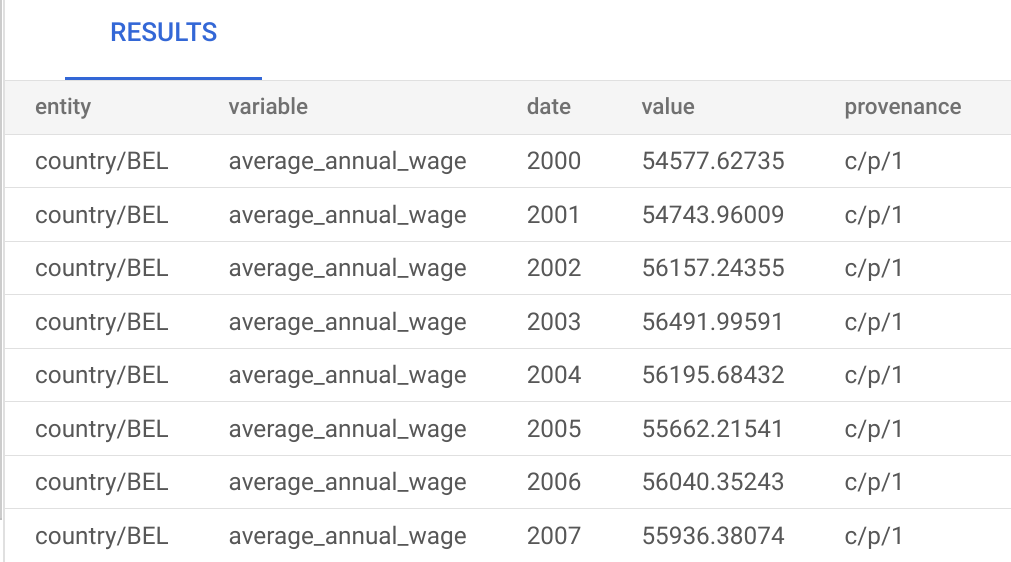
If you don’t see any data, go to https://console.cloud.google.com/run/jobs for your project, select the job you ran in the previous step, and click the Logs tab to look for errors.
View your running application
If this is the first time you are viewing the default image with your data, restart the service by running terraform apply again. If you want to change the image, see (Re)start the container with a new image.
The URL for your service is in the form https://NAMESPACE-datacommons-web-service-XXXXX.REGION.run.app. To get the exact URL:
- Go to the https://console.cloud.google.com/run/services page for your project.
- From the list of services, click the link the service created by the Terraform script. The app URL appears at the top of the page. If the service is running, the URL will be a clickable link. When you click on it, it should open in in another browser window or tab.
If the link is not clickable and the service is not running, go back to the Console Cloud Run page, click the Logs tab and look for errors. Also check the output of your terraform apply run.
Manage your service
By default, the Terraform scripts create a Cloud Run service named NAMESPACE-datacommons-web-service.
You need to restart the service every time you do any of the following:
- (Re)run the data management job to process new data: see Restart the services container
- Add or change service environment variables: see Restart the services container
- Pick up a newly released prebuilt image: see Restart the services container
- (Re)build a custom image: see Restart the container with a new image
Start/restart the services container
By default, the Terraform scripts create a service using the prebuilt Data Commons services image, gcr.io/datcom-ci/datacommons-services:stable.
If you are not making any changes to the image used in the container, you can just run terraform apply every time to restart. For example, if you are just setting service environment variables, you can add them to your terraform.tfvars file and rerun terraform apply.
Alternatively, you can use the following procedure.
- Cloud Console
- gcloud CLI
- Go to the https://console.cloud.google.com/run/services page for your project.
- From the list of services, click the link of the service created by the Terraform scripts.
- Click Edit & Deploy Revision.
- Optionally, make any necessary changes to the service that do not involve changing the container image URL. For example, to add or change an environment variable, click Variables & Secrets and Add variable.
- Click Deploy. It will take several minutes for the service to start.
From any local directory, run the following command:
gcloud run deploy SERVICE_NAME --image gcr.io/datcom-ci/datacommons-services:stable --region REGION [OTHER_OPTIONS...]You can specify any options as flags (see the gcloud deploy reference documentation). For example, to add or change an environment variable, use
--set-env-vars.
(Re)start the container with a new image
If you want to switch the prebuilt image or use a custom image, use the following procedure. To use a newly built custom image, you must first upload the image to the Artifact Registry before performing this procedure.
- Terraform (recommended)
- Cloud Console
- gcloud CLI
- Open the file
website/deploy/terraform-custom-datacommons/modules/terraform.tfvarsand add the following line:dc_web_service_image = "CONTAINER_IMAGE_URL"
The container image URL is the name of a prebuilt image, or the package name of a container you have uploaded to the Artifact Registry. - Optionally, add any other variables you want to change to
terraform.tfvars. - From the
modulesdirectory, runterraform apply.
- Go to the https://console.cloud.google.com/run/services page for your project.
- From the list of services, click the link of the service created by the Terraform scripts.
- Click Edit & Deploy Revision.
- Under Container image URL, click Select.
- In the Select container image from Artifact Registry pane, do either of the following:
- To select an image you have uploaded to the Artifact Registry:
Expand your artifact repo, expand the package name, and select an image/tag that you specified when you built the image.
- To select a prebuilt Data Commons image:
- Click Change project.
- In the search bar, enter
datcom-ciand click on the link that appears. - Expand gcr.io/datcom-ci and datacommons-services.
- Select the most recent image with the label stable.
- To select an image you have uploaded to the Artifact Registry:
- Optionally, make any other changes you want to the service.
- Click Deploy. It will take several minutes for the service to start.
From any local directory, run the following command:
gcloud run deploy SERVICE_NAME --image CONTAINER_IMAGE_URL --region REGION [OTHER_OPTIONS...]The container image URL is the name of a prebuilt image, or the package name of a container you have uploaded to the Artifact Registry. </p>
Upload a custom Docker image to the Artifact Registry
When you ran the create artifact registry script, it created a repository called PROJECT_ID-artifacts. If you are using a custom-built Docker service image, you need to upload it to the Google Cloud Artifact Registry repository, where it will be picked up by the Cloud Run Docker services container.
Any time you make changes to the website and want to deploy your changes to the cloud, you need to rerun this procedure.
- Bash script
- Docker commands
./run_cdc_dev_docker.sh --actions upload --image SOURCE_IMAGE_NAME:SOURCE_IMAGE_TAG [--package TARGET_IMAGE_NAME:TARGET_IMAGE_TAG]To build a new image and and upload it:
./run_cdc_dev_docker.sh --actions build_upload --image IMAGE_NAME:IMAGE_TAG [--package TARGET_IMAGE_NAME:TARGET_IMAGE_TAG]If you don't specify the
--package option, the package name and tag will be the same as the source image.
- Build a local version of the Docker image, following the procedure in Build a local image.
- Generate credentials for the Docker package:
gcloud auth configure-docker REGION-docker.pkg.dev
- Create a package from the source image you created in step 1:
docker tag SOURCE_IMAGE_NAME:SOURCE_IMAGE_TAG \
   REGION-docker.pkg.dev/PROJECT_ID/ARTIFACT_REPO/TARGET_IMAGE_NAME:TARGET_IMAGE_TAG
The artifact repo isPROJECT_ID-artifacts. - Push the image to the registry:
docker push CONTAINER_IMAGE_URL
The container image URL is the full name of the package you created in the previous step, including the tag. For example: `us-central1-docker-pkg.dev/myproject/myrepo/datacommons:latest`.
- The target image name and tag can be the same as the source or different.
- Docker package names must be in the format
REGION-docker-pkg.dev. The default region in the Terraform scripts isus-central1.
Tip: We suggest you name and tag your image the same for every release, and let the Artifact Registry manage versioning. This way you won’t have to continually update your Terraform configuration to a new name every time you upload a new build.
It will take several minutes to upload.
To deploy the new image, restart the web services Cloud Run service to pick it up.
Verify the upload
When the push completes, verify that the container has been uploaded in the Cloud Console:
- Go to https://console.cloud.google.com/artifacts for your project.
- In the list of repositories, click on
PROJECT_ID-artifacts. You should see your image in the list. You can click through to view revisions and tags.
Optional: Provide custom MCP instructions files
As described in Provide custom instructions for the server, you can upload custom instructions files to Google Cloud Storage, that will be loaded by the MCP server when it is restarted.
Before running this procedure, please see Required directory structure, download the default Markdown instruction file(s) you want to customize from https://github.com/datacommonsorg/agent-toolkit/blob/main/packages/datacommons-mcp/datacommons_mcp/instructions/tools, and make your edits to the files locally.
- Cloud Console
- gcloud CLI
Step 1: Upload your files to Google Cloud Storage:
- Go to https://console.cloud.google.com/storage/browse for your service and select the Data Commons bucket that was created by the Terraform script.
- Click Create folder.
- In the Create folder dialog, provide a name for the folder. It can be anything you want; for example, `mcp_instructions`.
- Click on the link of the new folder you just created, and click Create folder again.
- In the Create folder dialog, name the new folder
tools. - Click on the link of the tools folder.
- Click Upload files and select any of the customized
TOOL_NAME.mdfile you want to upload.
Step 2: Set the environment variable and restart the Cloud Run service:
- Go to the https://console.cloud.google.com/run/services page for your project.
- From the list of services, click the link of the service created by the Terraform scripts.
- Click Edit & Deploy Revision and select the Variables & Secrets tab.
- Click Add variable.
- Add a new variable as follows:
- name:
DC_INSTRUCTIONS_DIR - value: The GCS path to your instructions directory, in the form
gs://GCS_BUCKET/INSTRUCTIONS_FOLDER
- name:
- Click Deploy. It will take several minutes for the service to start.
Step 1: Upload your files to Google Cloud Storage:
- Navigate to a local directory where your customized Markdown files are stored, e.g.
website/instructions/tools/. - Run the following command:
gcloud storage cp *.md gs://BUCKET_NAME/INSTRUCTIONS_FOLDER/tools/
The instructions folder can be any name you want.
Step 2: Set the environment variable and restart the Cloud Run service:
From any local directory, run the following command:
gcloud run deploy SERVICE_NAME --image CONTAINER_IMAGE_URL --set-env-vars DC_INSTRUCTIONS_DIR=gs://GCS_BUCKET/INSTRUCTIONS_FOLDER --region REGION
- The container image URL is a prebuilt Data Commons image, or a custom image you have previously uploaded to the artifact registry.
- The instructions folder is the one you created in the previous step, specified in the form
gs://GCS_BUCKET/INSTRUCTIONS_FOLDER.
Connect an AI agent to the MCP server
You can use any AI agent to connect to the MCP server. The MCP server is addressable at any hostname plus the /mcp path. You can use the internal Cloud Run service app name during development. Your users would use the public domain name you configure for your website.
To connect an AI agent to the Cloud Run service app:
- Obtain the app URL for your service.
-
In the configuration for the agent/client, specify the HTTP URL as the hostname for your service +
mcppath. For example, for Gemini CLI, you would add this section to yoursettings.jsonfile:{ ... "mcpServers": { "SERVER_NAME": { "httpUrl": "APP_URL/mcp" } } ... }The server name can be anything you want, for example,
datacommons-mcp-custom. - Run the agent as usual.
Update your Terraform deployment
If you want to continue to use Terraform to deploy changes to your service, do the following:
- Add your updated variables in the
terraform.tfvarsfile. - Authenticate to GCP.
- Run all the Terraform commands as listed in Run the Terraform deployment.
Note: Whenever you make future updates to your deployments, we recommend using Terraform to do so. If you use the Cloud Console or gcloud to make updates and try to run Terraform again, it will override any changes you have made outside of Terraform. For options that are available as variables in the Data Commons
variables.tf, you must sync yourterraform.tfvarsoptions to the same values you have set outside Terraform before running Terraform commands again. If you use the Cloud Console or gcloud to configure options that are not available as Data Commons variables, you must not run Terraform again.
If you intend to deploy several Google Cloud instances, see the next section for a recommended way of using Terraform to do this.
Manage multiple Terraform deployments
If you would like to create multiple Terraform deployments, for example, development, staging, and production, you can easily do so using Terraform Workspaces and multiple tfvars configuration files. You can run the deployments in different projects, or run them in the same project using namespaces to keep them separate.
To create additional deployments:
- In the
website/deploy/terraform-custom-datacommons/modulesdirectory, make a copy of theterraform.tfvarsand name it to something different that indicates its purpose, for example:cp terraform.tfvars terraform_prod.tfvarsTip: You may wish to rename the original
terraform.tfvarsto something more descriptive as well. - Do any of the following:
- If you intend to run the new deployment in a different GCP project, edit the
project_idvariable and specify the project ID. - If you intend to run the new deployment in the same GCP project, edit the
namespacevariable to name it according to the environment you are creating, e.g.-prod. When you run the deployment, all created services will use the new namespace.
- If you intend to run the new deployment in a different GCP project, edit the
- Add any relevant variables you want to change to the file, as described in Edit optional variables. For example, for a production environment, you may want to increase the number of service replicas, add a caching layer, and so on. (See Launch on Cloud for more details.)
- Add a new workspace for each environment you want:
terraform workspace new WORKSPACE_NAME
This creates an empty workspace with no configuration attached to it.
- When you are ready to actually run the deployment, switch to the desired workspace, and attach the relevant configuration to it:
terraform workspace select WORKSPACE_NAME
terraform plan -var-file=FILE_NAME
- When you are ready to run the deployment, specify the configuration file again:
terraform apply -var-file=FILE_NAME
Page last updated: July 06, 2026 • Send feedback about this page