Define custom (non-place) entities
This page shows you how to define (or extend) custom (non-place) entities, which may be part of the process to add your data to your Custom Data Commons instance. It assumes you are already familiar with the content in Key concepts and Prepare and load your own data.
Before creating new entities or entity types, please see Determine if you need to create new entities to determine if you can reuse existing entities and/or entity types from base Data Commons (datacommons.org).
Note: It is not necessary to create new entities for your Data Commons instance if your data is aggregated by a place type, or your data includes entities that already exist in the base.
- Overview
- Prepare your data
- Step 1: Define new entity types (if needed)
- Step 1a: Define enumerations for the entity type (optional)
- Step 2: Define new entities
- Step 3: Write the config.json file
- Step 4: Add statistical variables and observations for new entities
- Step 5: Add the observations CSV to config.json
- Example enum definitions
- Load your entities data
Overview
New entity types are defined in an MCF file. It may be the same file in which you define variables, or it can be a separate one.
New entities (instantiations of a type) can be defined in either MCF or CSV files. If you have thousands of new entities of the same type, you will likely find it much easier to manage their definitions in a CSV file. On this page, we will use CSV for examples, and you can translate them into MCF if you like.
The directory structure is the same as for variables.
In the following sections, we’ll describe setting up the non-place entities, as well as how to use them with custom statistical variables. Also see the example files provided in https://github.com/datacommonsorg/website/tree/master/custom_dc/sample/entities.
Prepare your data
Step 1: Define new entity types (if needed)
If you need to define custom entity types in MCF (rare), you define them in MCF. You can have a single MCF file or as many as you like.
For example, let’s say a state government wanted to track the finances of its agencies. There is no “agency” type node in the Data Commons graph, so they could create one like this:
Node: dcid:mystategov/Agency
name: "Government agency"
typeOf: schema:Class
subClassOf: dcs:Government
description: "Agency of a government, such as legal, legislative, insurance, taxes, etc."
For entity types, an MCF block definition must include the following fields:
Node: This is the DCID of the entity or entity type you are defining. DCIDs can be a maximum of 256 characters long. It is also recommended that you use a prefix to create a namespace for your own entity types. The prefix must be separated from the main entity type name by a slash (/), and should represent your organization, dataset, project, or whatever makes sense for you. For example, if your organization or project name is “foo.com”, you could use a namespacefoo/. This way it is easy to distinguish your custom entity types from entity types in the base DC.name: This is the readable name that will be displayed in various parts of the UI.typeOf: For an entity type, this must beClass.subClassOf: To link your new entity type to existing types in the knowledge graph, this can be any existing class that is somehow related. This inserts the entity type into a class hierarchy. You may also define sub-types of types you define, by using this field to indicate the “parent” class. In this example, the parent class isGovernment.
You can add other optional properties, such as schema.org meta properties, and any number of key:value pairs.
Step 1a: Define enumerations for the entity type (optional)
Data Commons relies fairly heavily on enumerations to define subclasses (there are hundreds of them in the graph) of other entity types. For example, in the U.S., Agency would likely actually be defined as an enum with members StateAgency, FederalAgency, MunicipalAgency, and so on. If you are creating one or more new entity types, you may find it convenient to use enums to break down classes into multiple sub-types. If you want to be able to link entities by subtype, you must define enums for them, in MCF.
See Example enum definitions for details.
Step 2: Define new entities
Now let’s walk through the process of defining the actual entities you need for your data. You can define entities in both MCF files or CSV files, but we will only provide examples of CSV here. (You can easily convert these to MCF if desired.)
For example, let’s say you wanted to track the performance of individual hospitals in your state rather than at the aggregated state level. Base Data Commons already has an entity type Hospital, but you’ll notice that there are no actual hospitals in the knowledge graph. The first step is to add definitions for hospital entities. Here is an example of real-world data from the U.S. Department of Health and Human Services for the state of Alaska. The CCN is a certification number that uniquely identifies U.S. hospitals. We’ll use that number as the DCIDs.
ccn,name,address,City,zipCode,hospitalType
20001,Providence Alaska Medical Center,3200 Providence Drive,geoId/02020,99508,Short term hospital
20008,Bartlett Regional Hospital,3260 Hospital Dr,geoId/02110,99801,Short term hospital
22001,St Elias Specialty Hospital,4800 Cordova Street,geoId/02020,99503,Long term hospital
20017,Alaska Regional Hospital,2801 Debarr Road,geoId/02020,99508,Short term hospital
21301,Providence Valdez Medical Center,Po Box 550,geoId/02261,99686,Critical access hospital
21304,Petersburg Medical Center,Po Box 589,geoId/02280,99833,Critical access hospital
21306,Providence Kodiak Island Medical Ctr,1915 East Rezanof Drive,geoId/02150,99615,Critical access hospital
21311,Ketchikan Medical Center,3100 Tongass Avenue,geoId/02150,99901,Critical access hospital
A given CSV file can only contain one entity type, so if you are defining entities of more than one type (for example, schools and hospitals), use a separate file for each. When you add observations, put them in files separate from the entity definitions.
Here are the important points to note in this example:
- Each entity CSV file can contain as many columns as you need to define various properties of the entity.
- You must have one column that defines DCIDs for the entities.
- Columns can be in any order, with any heading. Even the column defining the DCIDs does not need to be first; you will specify the column to use for DCIDs in
config.json. - We recommended that you use a prefix to create a namespace for your own entities. It must be separated from the main variable name by a slash (
/). For example, if your organization or project name is foo.com, you could use a namespacefoo/. This way it is easy to distinguish your custom entities from entities in the base DC. - For any cells that reference existing entities, if you want to link your entities to them, you must specify them by DCID. In the above example, there is a
Citycolumn, that uses the existingCityDCIDs; inconfig.jsonwe’ll declare that column as an existing entity, so that our new hospital entities will be linked to theCityentity type in the knowledge graph. By contrast, zip codes won’t be used to link these entities, so thezipCodevalues aren’t given as DCIDs (although they could be).
Important: Whenever you want to link properties of entities you are defining to existing entities, the cell values must contain DCIDs of the relevant entities. If you don’t know the DCID, see Search for an existing entity.
Step 3: Write the config.json file
The next step is to create the config.json file to configure your new entities. This is the same config.json file you use for observations.
Here’s an example of how the file could look for our hospital data.
{
  "inputFiles": {
    "hospital_entities.csv": {
      "importType": "entities",
      "rowEntityType": "Hospital",
      "idColumn": "ccn",
      "entityColumns": [
        "City"
      ],
      "provenance": "Alaska Weekly Hospital Capacity"
    }
  },
  "sources": {
    "HHS Protect Public Data Hub": {
      "url": "https://public-data-hub-dhhs.hub.arcgis.com/",
      "provenances": {
        "Alaska Weekly Hospital Capacity": "https://public-data-hub-dhhs.hub.arcgis.com/datasets/d47bfcaac2544c2eb1fcfb3d36b5ed23_0/explore"
      }
    }
  }
}
These are the important fields to note:
importType: By default this isobservations; to tell the importer that you are adding entities in this CSV file, you must specifyentities.rowEntityType: This specifies the entity type that the entities are derived from. In this case, we specify an existing entity type,Hospital. Note that the entity type must be identified by its DCID.idColumn: This indicates to the importer to use the values in the specified column as DCIDs. In this case, we specifyccn, which indicates that the values in theccncolumn should be used as the DCIDs for the entities.entityColumns: This is optional: if you want properties of your new entities to be linked to existing entities, you can specify the column(s) containing the matching entities. In this case we list theCitycolumn. Note that the heading of this column must be the DCID of the corresponding entity type, and the values must be the DCIDs of each entity referenced. If you would like the hospitals to be linked by zipcode, you would need to provide the DCID for each zip code.
The other fields are explained in the Data config file specification reference.
Step 4: Add statistical variables and observations for new entities
If you are providing observations for the non-place entities, the observations must be in a separate file. You’ll need a different CSV file for each entity type for which you are providing observations.
For example, let’s say you’ve already defined in MCF the following variables that measure weekly hospital capacity:
total_count_staffed_bedscount_staffed_adult_bedscount_staffed_inpatient_icu_bedscount_staffed_adult_inpatient_icu_bedscount_staffed_inpatient_icu_beds_occupiedcount_staffed_adult_icu_beds_occupied
Aside: Note that the thing being measured here is “beds”. There is an existing Bed class in Data Commons. So when defining such variables, you would specify schema:bed as the populationType.
Just like for place entities, you provide observations for these variables in a CSV file. The CSV observations file uses the same variable-per-row format and column headings as places. The only difference from a place-based CSV is that the entity column contains the DCIDs of the entities you have defined in a separate CSV (or MCF) file, instead of places. In our example, the DCIDs are the CCNs of the hospitals.
entity,date,variable,value
20001,2023-01-27,count_staffed_adult_beds,1048
20001,2023-01-27,count_staffed_adult_icu_beds_occupied,146
20001,2023-01-27,count_staffed_adult_inpatient_icu_beds,146
20001,2023-01-27,count_staffed_inpatient_icu_beds,264
20001,2023-01-27,count_staffed_inpatient_icu_beds_occupied,264
20001,2023-01-27,total_count_staffed_beds,1262
20017,2023-01-27,count_staffed_adult_beds,0
20017,2023-01-27,count_staffed_adult_icu_beds_occupied,0
20017,2023-01-27,count_staffed_adult_inpatient_icu_beds,
20017,2023-01-27,count_staffed_inpatient_icu_beds,
20017,2023-01-27,count_staffed_inpatient_icu_beds_occupied,0
21301,2023-01-27,count_staffed_adult_beds,780
21301,2023-01-27,count_staffed_adult_icu_beds_occupied,62
21301,2023-01-27,count_staffed_adult_inpatient_icu_beds,62
21301,2023-01-27,count_staffed_inpatient_icu_beds,101
21301,2023-01-27,count_staffed_inpatient_icu_beds_occupied,66
21301,2023-01-27,total_count_staffed_beds,836
...
We could also have added an observationPeriod column, which would be set to P7D for all rows.
Step 5: Add the observations CSV to config.json
Now let’s update the config file to cover both the entities and the statistical variables. Since there can only be a single config.json file, CSV files of observations and entities must be specified in the same config.
{
  "inputFiles": {
    "hospital_entities.csv": {
      "importType": "entities",
      "rowEntityType": "Hospital",
      "idColumn": "ccn",
      "entityColumns": ["City"],
      "provenance": "Alaska Weekly Hospital Capacity"
    },
    "hospital_observations.csv": {
      "importType": "observations",
      "format": "variablePerRow",
      "entityType": "Hospital",
      "provenance": "Alaska Weekly Hospital Capacity"
    }
  },
  "sources": {
    "HHS Protect Public Data Hub": {
      "url": "https://public-data-hub-dhhs.hub.arcgis.com/",
      "provenances": {
        "Alaska Weekly Hospital Capacity": "https://public-data-hub-dhhs.hub.arcgis.com/datasets/d47bfcaac2544c2eb1fcfb3d36b5ed23_0/explore"
      }
    }
  }
}
Example enum definitions
In our hospital data, hospitals are classified into 3 types: “long term”, “short term” and “critical access”. A common way to represent these types is to define an enum, and each possible value as an instantiation of the enum. Here’s an example:
Node: dcid:HospitalTypeEnum
name: "Hospital type enum"
typeOf: schema:Class
subClassOf: schema:Enumeration
description: "Classifies hospitals into different types according to populations served."

Node: dcid:LongTermHospital
name: "Long-term hospital"
typeOf: dcid:HospitalTypeEnum
description: "Hospitals where patient stays are longer than 25 days."

Node: dcid:ShortTermHospital
name: "Short-term hospital"
typeOf: dcid:HospitalTypeEnum
description: "Hospitals where patient stays are shorter than 25 days."

Node: dcid:CriticalAccessHospital
name: "Critical access hospital"
typeOf: dcid:HospitalTypeEnum
description: "Small, rural hospitals with fewer than 25 beds."
These are the important fields to note:
- For the node representing the enum itself, it must be of type
Classand must be a subclass ofEnumeration. - For the nodes representing the allowed values of the enum, they must be of the type you have defined as the enum.
If we were to use these definitions in the hospitals CSV file, the last column would look like this:
HospitalTypeEnum
ShortTermHospital
LongTermHospital
ShortTermHospital
CriticalAccessHospital
...
Then, if desired, you could provide aggregated observations for each hospital types. For example:
entity,date,variable,value
ShortTermHospital,2023-01-27,count_staffed_adult_beds,...
ShortTermHospital,2023-01-27,count_staffed_adult_icu_beds_occupied,...
ShortTermHospital,2023-01-27,count_staffed_adult_inpatient_icu_beds,...
ShortTermHospital,2023-01-27,count_staffed_inpatient_icu_beds,...
ShortTermHospital,2023-01-27,count_staffed_inpatient_icu_beds_occupied,...
ShortTermHospital,2023-01-27,total_count_staffed_beds,...
LongTermHospital,2023-01-27,count_staffed_adult_beds,...
LongTermHospital,2023-01-27,count_staffed_adult_icu_beds_occupied,...
LongTermHospital,2023-01-27,count_staffed_adult_inpatient_icu_beds...
LongTermHospital,2023-01-27,count_staffed_inpatient_icu_beds...
LongTermHospital,2023-01-27,count_staffed_inpatient_icu_beds_occupied,...
...
Load your entities data
To load and serve your data locally, see the procedures in Load local custom data.
To load data in Google Cloud, see Load data in Google Cloud.
Verify your entities data
If the servers have started up without errors, check to ensure that your data is showing up as expected.
Non-place entities without observational data are only displayed in the knowledge graph browser. To view your entities in a local server, enter the following in the browser address bar:
https://localhost:8080/browser/ENTITY_DCID
The ENTITY_DCID is any DCID you have created previously. Using our previous hospitals example, we could enter https://localhost:8080/browser/AKgov/20017 and would see this:
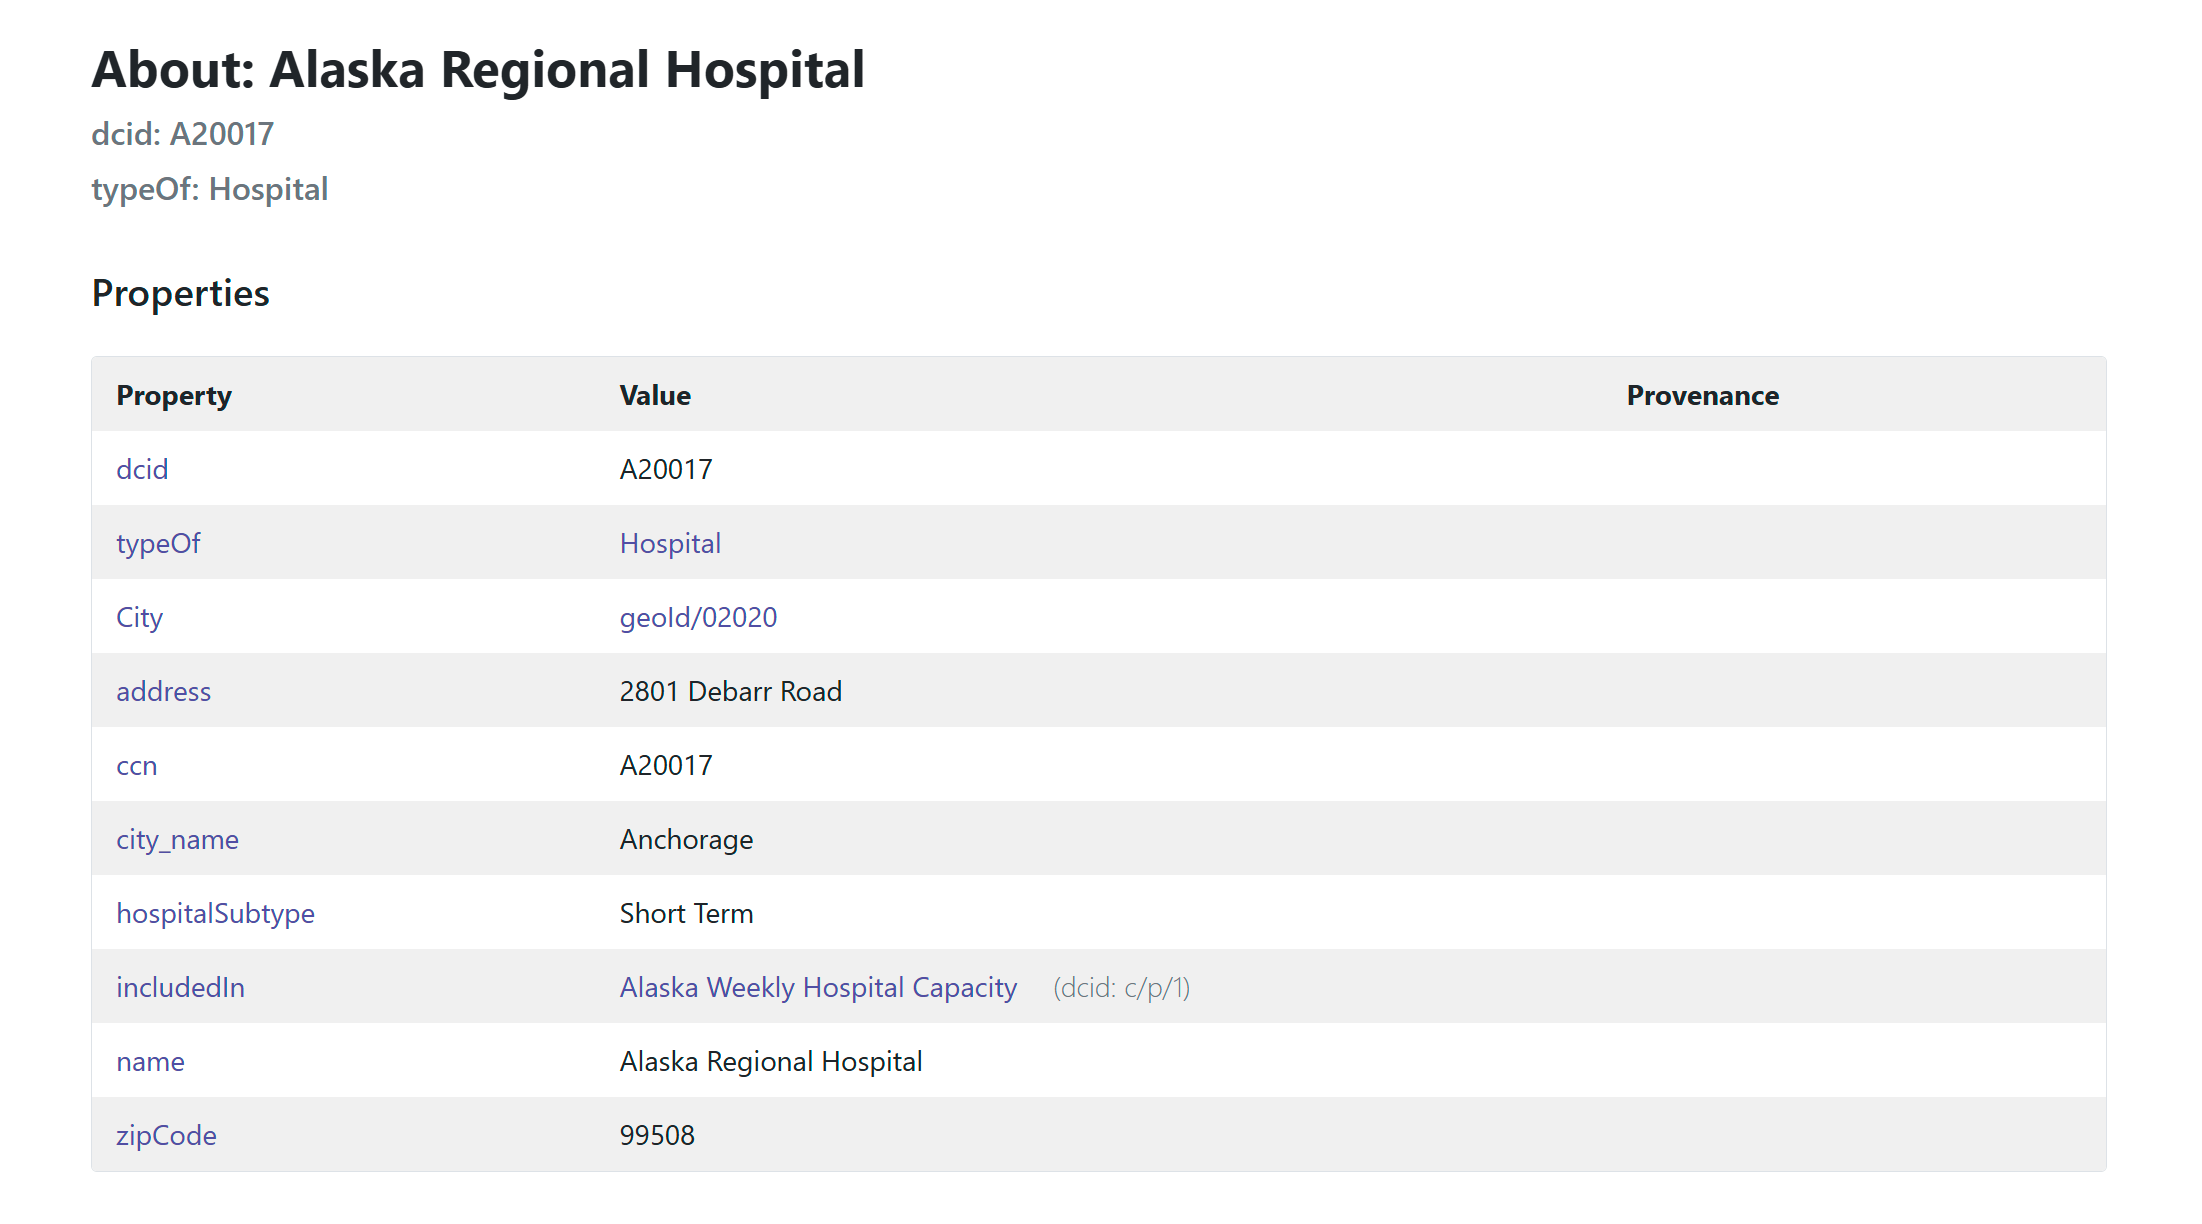
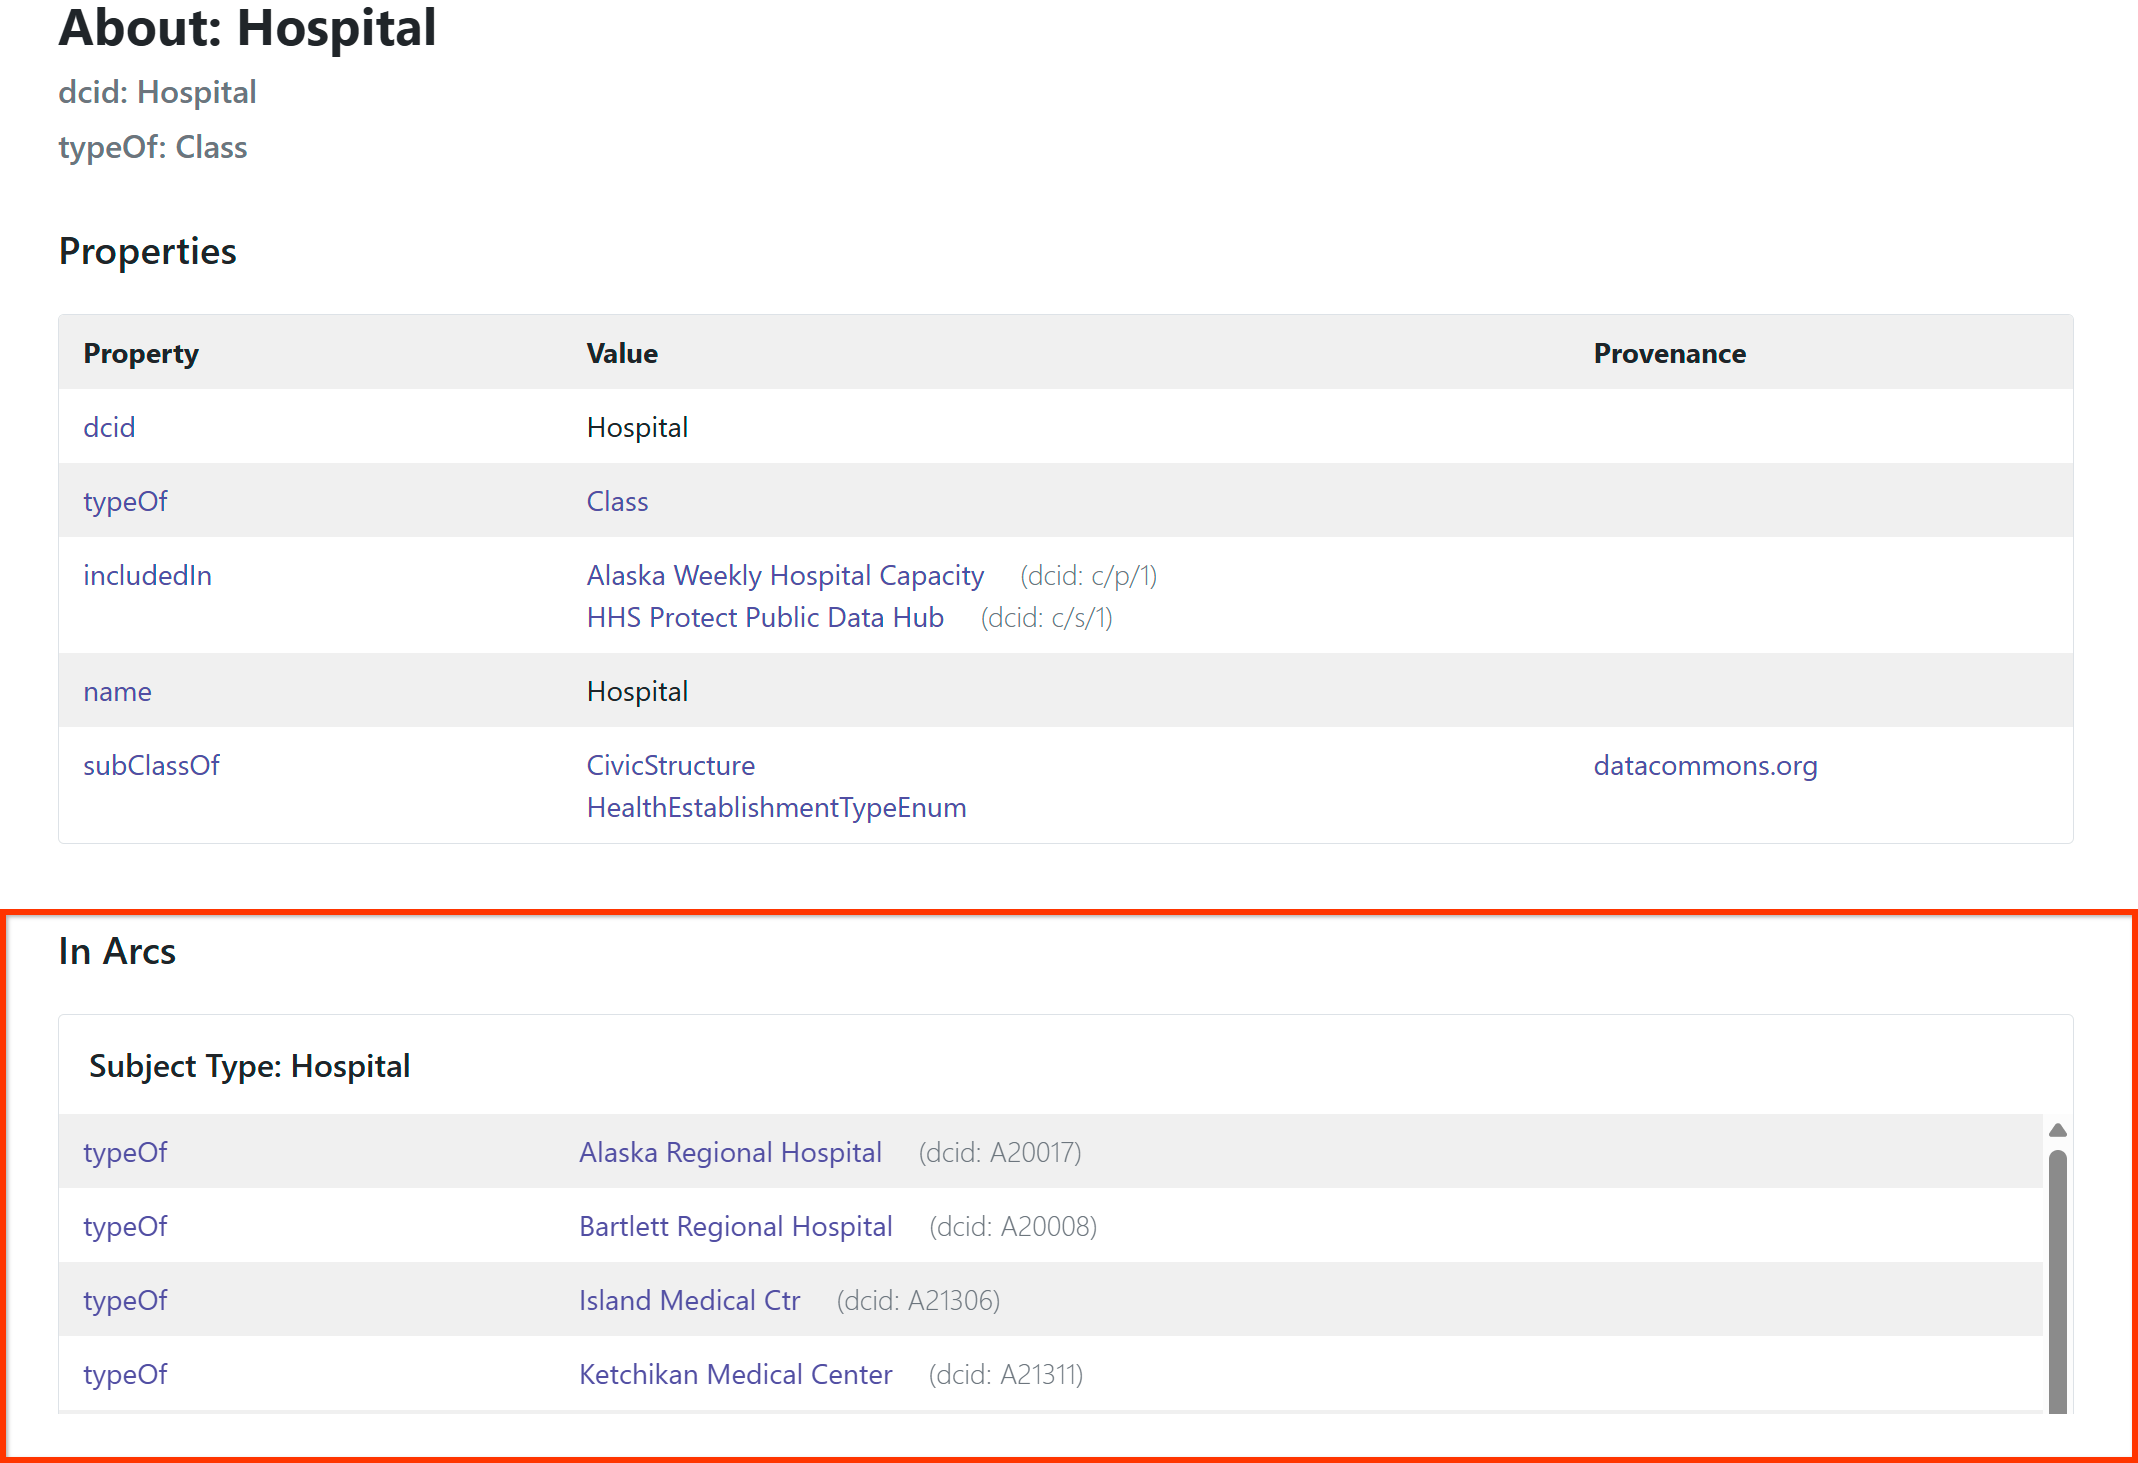
For an entity type, you will see all the entities you’ve created as instances of that type listed in the In Arcs section, with clickable links. For example:
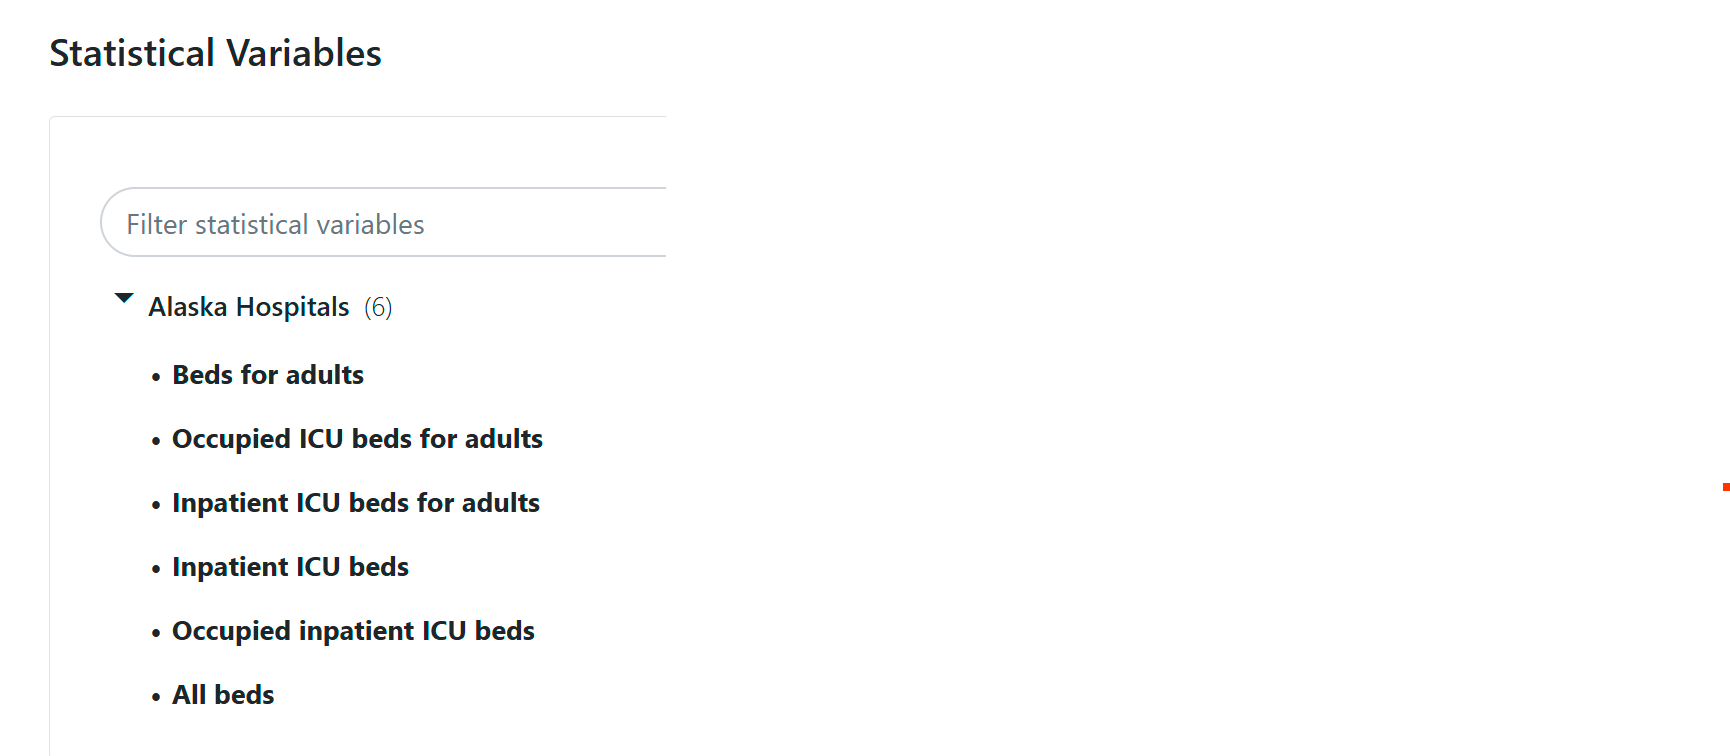
If you’ve associated statistical variables with an entity, you will see them at the bottom of the page, with timeline graphs. For example:
See Verify your data for more details on checking variables and observational data.
Page last updated: July 06, 2026 • Send feedback about this page