Load data in Google Cloud
This page shows you how to store your custom data in Google Cloud, and create the data management container as a Google Cloud Run job. This is step 4 of the recommended workflow.
- Overview
- Prerequisites
- One-time setup steps
- Manage your data
- Advanced setup (optional): Run the data management container locally
- Advanced setup (optional): Access Cloud data from a local services container
Overview
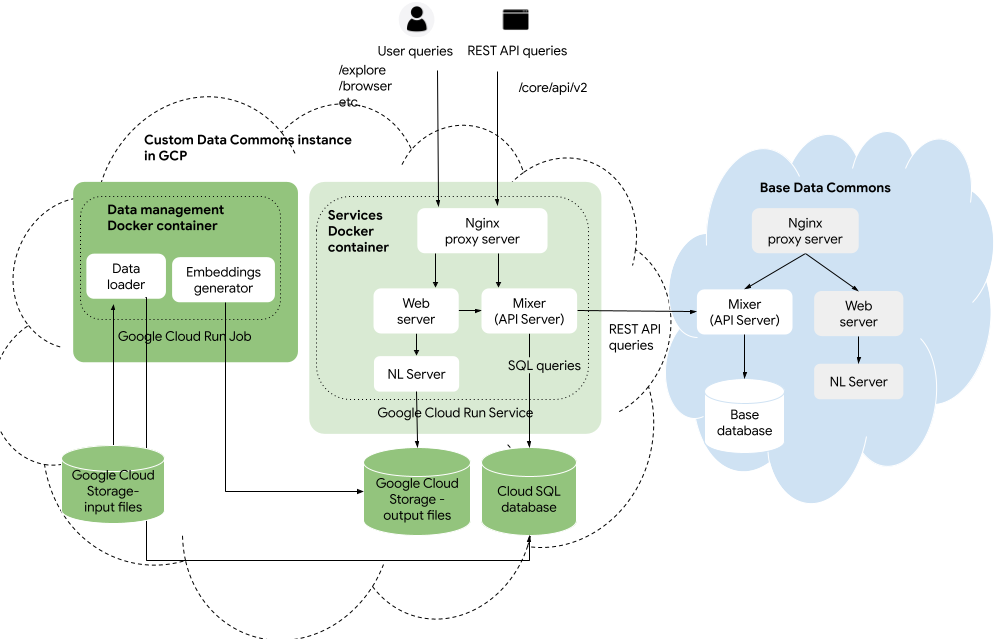
Once you have tested locally, the next step is to get your data into the Google Cloud Platform. You upload your CSV and JSON files to Google Cloud Storage, and run the Data Commons data management Docker container as a Cloud Run job. The job will transform and store the data in a Google Cloud SQL database, and generate NL embeddings stored in Cloud Storage.
Alternatively, if you have a very large data set, you may find it faster to store your input files and run the data management container locally, and output the data to Google Cloud Storage. If you would like to use this approach, follow steps 1 to 3 of the one-time setup steps below and then skip to Run the data management container locally.
Prerequisites
- A GCP billing account and project.
- Optional: Install the gcloud CLI.
One-time setup steps
Step 1: Choose a location
While you are testing, you can start with a single Google Cloud region; to be close to the base Data Commons data, you can use us-central1. However, once you launch, you may want to host your data and application closer to where your users will be. In any case, you should use the same region for your Google Cloud SQL instance, the Google Cloud Storage buckets, and the Google Cloud Run service where you will host the site. For a list of supported regions, see Cloud SQL Manage instance locations.
Step 2: Create a Google Cloud Storage bucket
This stores the CSV and JSON files that you will upload whenever your data changes. It also stores generated files files in a datacommons subdirectory when you run the data management job.
- Go to https://console.cloud.google.com/storage/browser for your project.
- Next to Buckets, click Create.
- Enter a name for this bucket.
- For the Location type, choose the same regional options as for Cloud SQL above.
- When you have finished setting all the configuration options, click Create.
- In the Bucket Details page, click Create Folder to create a new folder to hold your data and name it as desired.
-
Optionally, create separate folders to hold input and output files, or just use the same one as for the input.
Note: If you plan to run the data management container locally, you only need to create a single folder to hold the output files.
- Record the folder path(s) as
gs://BUCKET_NAME/FOLDER_PATHfor setting theINPUT_DIRandOUTPUT_DIRenvironment variables below.
Step 3: Create a Google Cloud SQL instance
This stores the data that will be served at run time. The Data Commons data management job will create the SQL tables and populate them when you start the job.
- Go to https://console.cloud.google.com/sql/instances for your project.
- Next to Instances, click Create Instance.
- Click Choose MySQL.
- If necessary, enable APIs as directed.
- Set an instance ID. Record the instance connection name in the form of
INSTANCE_IDfor setting environment variables below. - Set a root password, and record it for setting environment variables below.
- For the Location type, choose the relevant regional option.
- When you have finished setting all the configuration options, click Create Instance. It may take several minutes for the instance to be created.
- When the instance is created and the left navigation bar appears, select Users.
- Add at least one user and password.
- Select Databases.
- Click Create Database.
- Choose a name for the database or use the default,
datacommons. - Click Create.
- In the Overview page for the new instance, record the Connection name to set in environment variables in the next step.
Step 4 (optional but recommended): Add secrets to the Google Cloud Secret Manager
Although this is not strictly required, we recommend that you store secrets, including your API keys and DB passwords, in Google Cloud Secret Manager, where they are encrypted in transit and at rest, rather than stored and transmitted in plain text. See also the Secret Manager documentation for additional options available.
- Go to https://console.cloud.google.com/security/secret-manager for your project.
- Click Create secret.
- Enter a name that indicates the purpose of the secret; for example, for the Data Commons API key, name it something like
dc-api-key. - In the Secret value field, enter the value.
- Click Create secret.
- Repeat the same procedure for the Maps API key and any passwords you created for your Cloud SQL database in step 3.
Step 5: Create a Google Cloud Run job
Since you won’t need to customize the data management container, you can simply run an instance of the released container provided by Data Commons team, at https://console.cloud.google.com/gcr/images/datcom-ci/global/datacommons-data.
See also the Cloud Run documentation for links to more information on all the options you may set on your jobs.
- Go to https://console.cloud.google.com/run/ for your project.
- Click Create job.
- In the Container image URL field, enter
gcr.io/datcom-ci/datacommons-data:stable. - Optionally, in the Job name field, enter an alternative name as desired.
- In the Region field, select the region you chose as your location.
- Leave the default Number of tasks as 1.
- Expand Container, Volumes, Connections, Security and expand Settings, and set the following options:
- Resources > Memory: 8 GiB
- Resources > CPU: 2
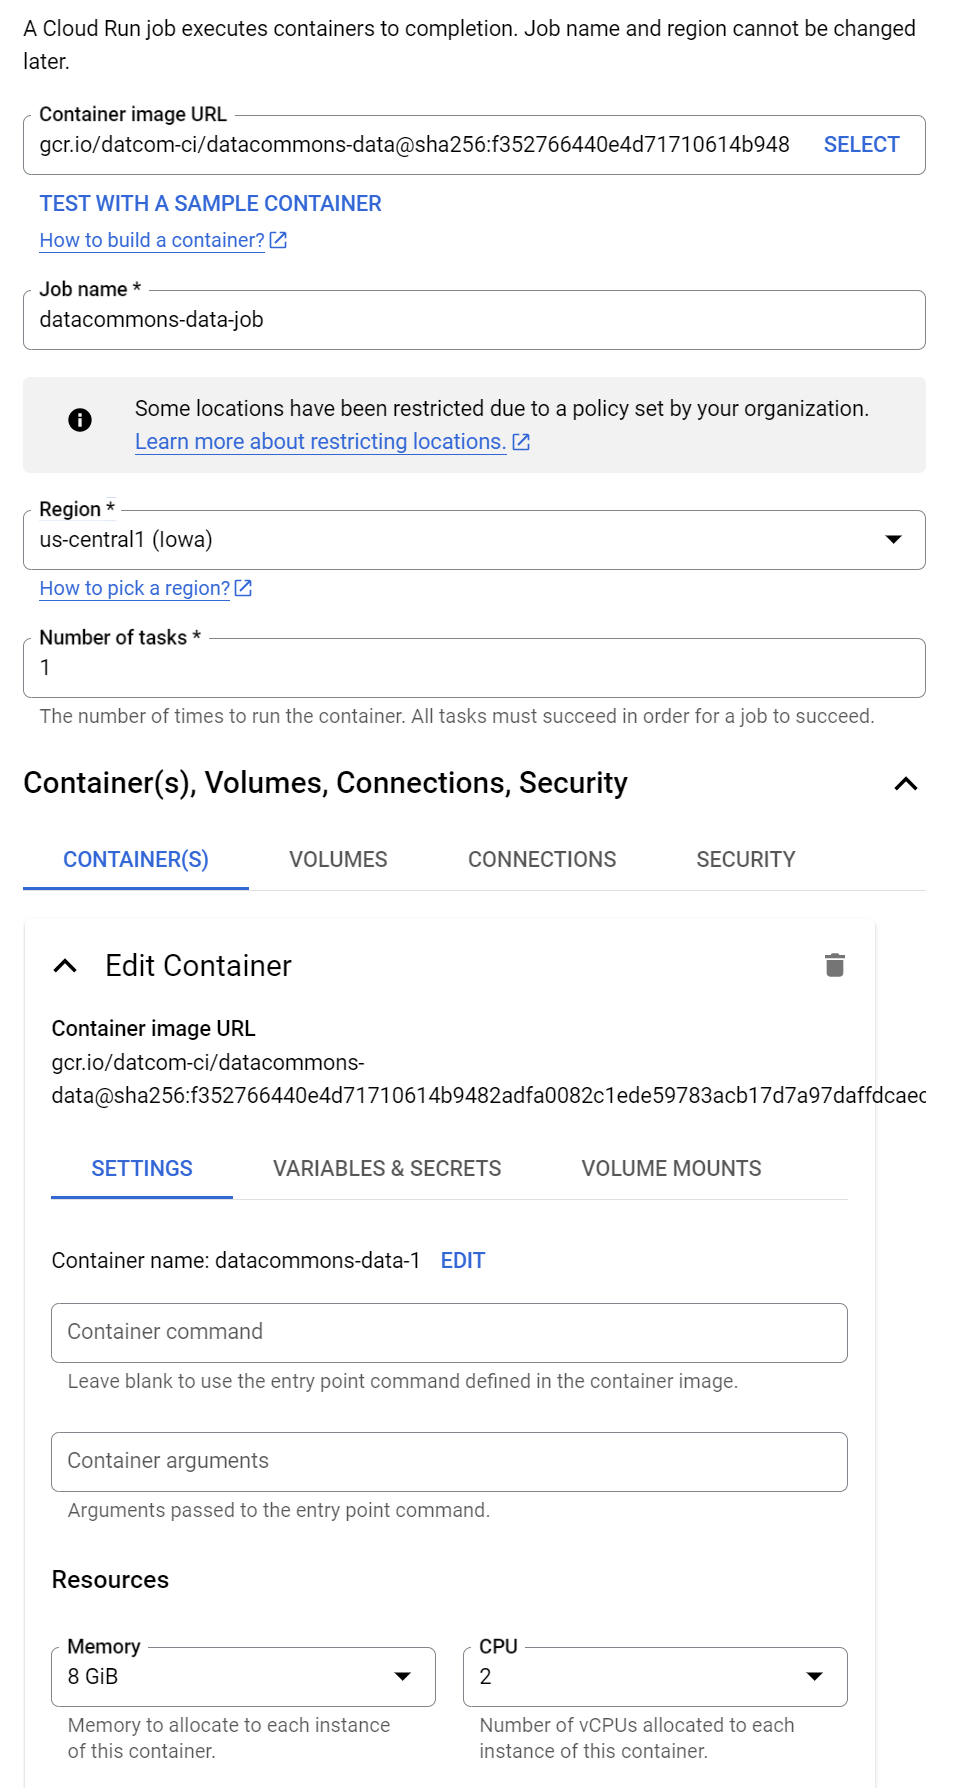
Now set environment variables:
- Click the Variables and Secrets tab.
- Click Add variable.
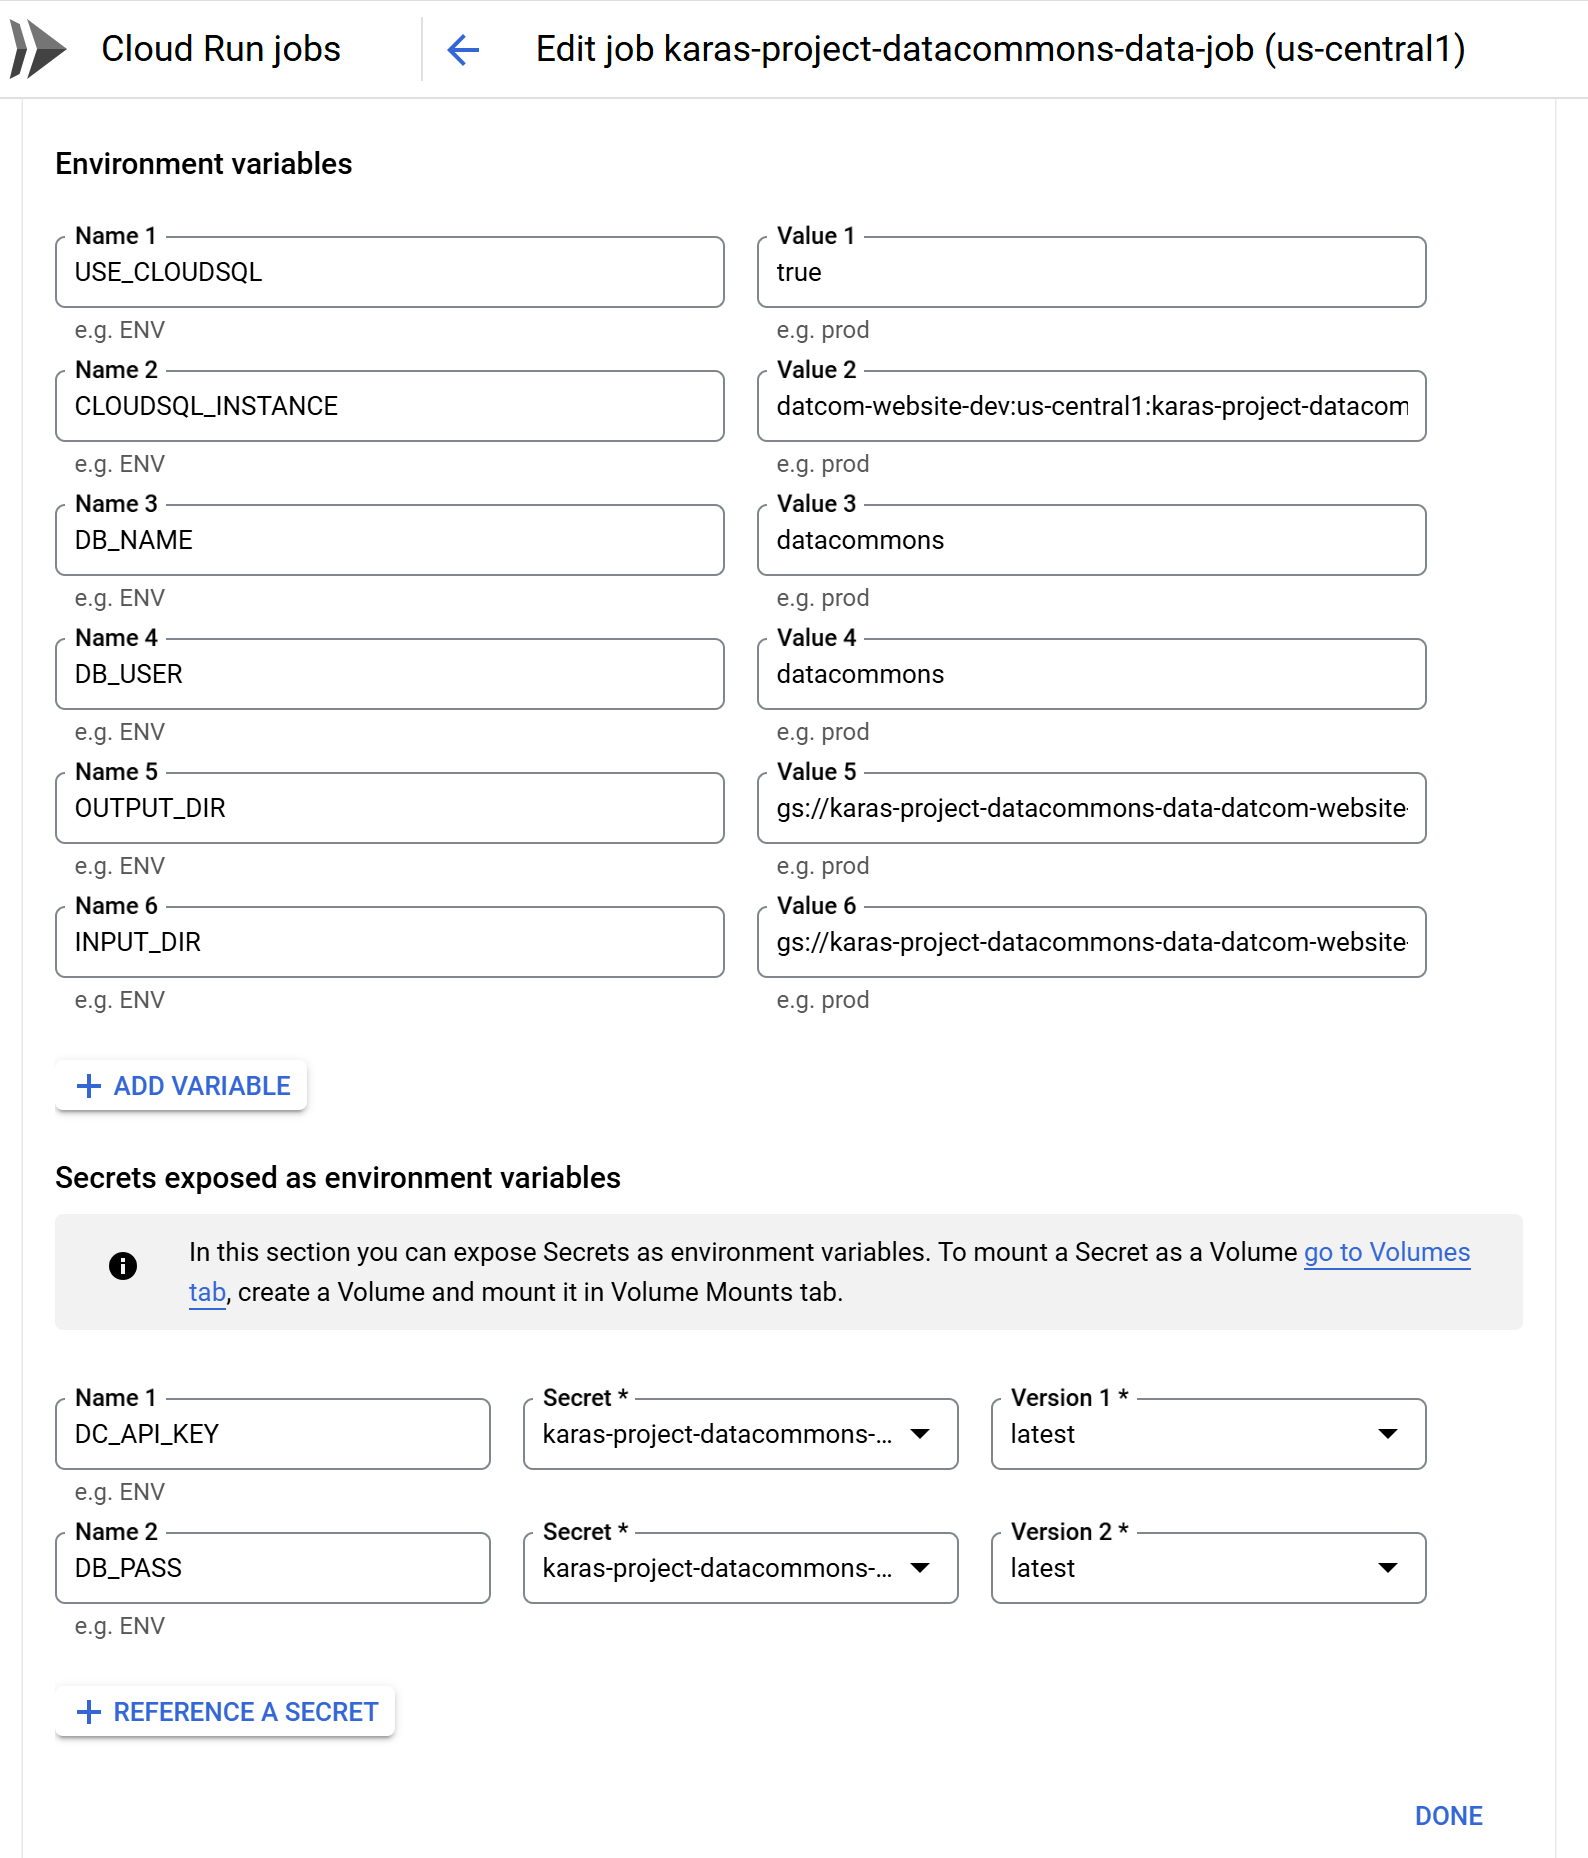
- Add names and values for the following environment variables:
USE_CLOUDSQL: Set totrue.INPUT_DIR: Set to the Cloud Storage bucket and input folder that you created in step 2 above.OUTPUT_DIR: Set to the Cloud Storage bucket (and, optionally, output folder) that you created in step 2 above. If you didn’t create a separate folder for output, specify the same folder as theINPUT_DIR.CLOUDSQL_INSTANCE: Set to the full connection name of the instance you created in step 3 above.DB_USER: Set to a user you configured when you created the instance in step 3, or torootif you didn’t create a new user.DB_NAME: Only set this if you configured the database name to something other thandatacommons.
- If you are not storing API keys and passwords in Google Secret Manager, add variables for
DC_API_KEYandDB_PASS. Otherwise, click Reference a secret, in the Name field, enterDC_API_KEY, and from the Secret drop-down field, select the relevant secret you created in step 4. Repeat forDB_PASS. -
When you are finished, click Done.
- If you have a large amount of data, adjust the Task capacity > Task timeout option accordingly. See Set task timeout (jobs) for more details.
- Click Create (but don’t run it immediately).
Manage your data
Step 1: Upload data files to Google Cloud Storage
As you are iterating on changes to the source CSV and JSON files, you can re-upload them at any time, either overwriting existing files or creating new folders. If you want versioned snapshots, we recommend that you create a new subfolder and store the latest version of the files there. If you prefer to simply incrementally update, you can simply overwrite files in a pre-existing folder. Creating new subfolders is slower but safer. Overwriting files is faster but riskier.
- Cloud Console
- gcloud CLI
- Go to https://console.cloud.google.com/storage/browse and select your custom Data Commons bucket.
- Navigate to the folder you created in the earlier step.
- Click Upload Files, and select all your CSV files and
config.json.
- Navigate to your local "input" directory where your source files are located.
- Run the following command:
gcloud storage cp config.json *.csv gs://BUCKET_NAME/FOLDER_PATH
Note: Do not upload the local
datacommonssubdirectory or its files.
Once you have uploaded the new data, you must rerun the data management Cloud Run job.
Step 2: Run the data management Cloud Run job
Now that everything is configured, and you have uploaded your data in Google Cloud Storage, you simply have to start the Cloud Run data management job to convert the CSV data into tables in the Cloud SQL database and generate the embeddings (in a datacommons/nl subfolder).
Every time you upload new input CSV or JSON files to Google Cloud Storage, you will need to rerun the job.
- Cloud Console
- gcloud CLI
- Go to https://console.cloud.google.com/run/jobs for your project.
- From the list of jobs, click the link of the "datacommons-data" job you created above.
- Optionally, if you have received a
SQL check failederror when previously trying to start the container, and would like to minimize startup time, click Execute with overrides and click Add variable to set a new variable with nameDATA_RUN_MODEand valueschemaupdate. - Click Execute. It will take several minutes for the job to run. You can click the Logs tab to view the progress.
- From any local directory, run the following command:
gcloud run jobs execute JOB_NAME
- To view the progress of the job, run the following command:
gcloud beta run jobs logs tail JOB_NAME
When it completes, to verify that the data has been loaded correctly, see Inspect the Cloud SQL database.
(Optional) Run the data management Cloud Run job in schema update mode
If you have tried to start a container, and have received a SQL check failed error, this indicates that a database schema update is needed. You need to restart the data management container, and you can specify an additional, optional, flag, DATA_RUN_MODE=schemaupdate. This mode updates the database schema without re-importing data or re-building natural language embeddings. This is the quickest way to resolve a SQL check failed error during services container startup.
- Cloud Console
- gcloud CLI
- Go to https://console.cloud.google.com/run/jobs for your project.
- From the list of jobs, click the link of the "datacommons-data" job you created above.
- Optionally, select Execute > Execute with overrides and click Add variable to set a new variable with name
DATA_RUN_MODEand valueschemaupdate. - Click Execute. It will take several minutes for the job to run. You can click the Logs tab to view the progress.
- From any local directory, run the following command:
gcloud run jobs execute JOB_NAME --update-env-vars DATA_RUN_MODE=schemaupdate
- To view the progress of the job, run the following command:
gcloud beta run jobs logs tail JOB_NAME
Inspect the Cloud SQL database
To view information about the created tables:
- Go to https://console.cloud.google.com/sql/instances for your project and select the instance you created earlier.
- In the left panel, select Cloud SQL Studio.
- In the Sign in to SQL Studio page, from the Database field, select the database you created earlier, e.g.
datacommons. - Enter the user name and password and click Authenticate.
- In the left Explorer pane that appears, expand the Databases icon, your database name, and Tables. The table of interest is
observations. You can see column names and other metadata. - To view the actual data, in the main window, click New SQL Editor tab. This opens an environment in which you can enter and run SQL queries.
-
Enter a query and click Run. For example, for the sample OECD data, if you do
select * from observations limit 10;, you should see output like this: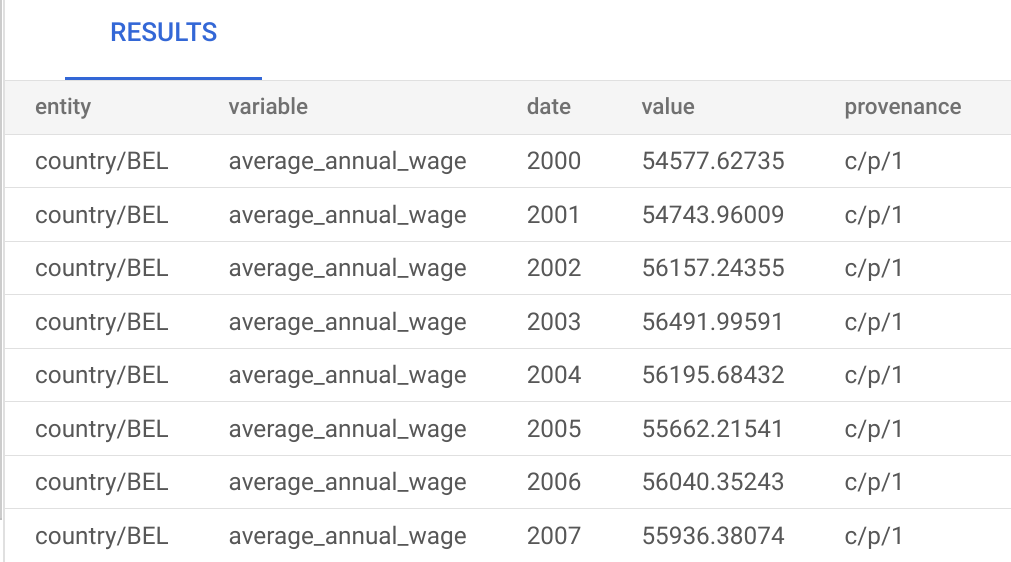
Advanced setup (optional): Run the data management container locally
This process is similar to running both data management and services containers locally, with a few exceptions:
- Your input directory will be the local file system, while the output directory will be a Google Cloud Storage bucket and folder.
- You must start the job with credentials to be passed to Google Cloud, to access the Cloud SQL instance.
Before you proceed, ensure you have completed steps 1 to 3 of the One-time setup steps above.
Step 1: Set environment variables
To run a local instance of the services container, you need to set all the environment variables in the custom_dc/env.list file. See above for the details, with the following differences:
- For the
INPUT_DIR, specify the full local path where your CSV and JSON files are stored, as described in the Quickstart. - Set
GOOGLE_CLOUD_PROJECTto your GCP project name.
Step 2: Generate credentials for Google Cloud authentication
For the services to connect to the Cloud SQL instance, you need to generate credentials that can be used in the local Docker container for authentication. You should refresh the credentials every time you rerun the Docker container.
Open a terminal window and run the following command:
gcloud auth application-default login
This opens a browser window that prompts you to enter credentials, sign in to Google Auth Library and allow Google Auth Library to access your account. Accept the prompts. When it has completed, a credential JSON file is created in
$HOME/.config/gcloud/application_default_credentials.json. Use this in the command below to authenticate from the docker container.
The first time you run it, may be prompted to specify a quota project for billing that will be used in the credentials file. If so, run this command:
gcloud auth application-default set-quota-project PROJECT_ID
If you are prompted to install the Cloud Resource Manager API, press y to accept.
Step 3: Run the data management Docker container
From your project root directory, run:
docker run \
--env-file $PWD/custom_dc/env.list \
-v INPUT_DIRECTORY:INPUT_DIRECTORY \
-v OUTPUT_DIRECTORY:OUTPUT_DIRECTORY \
-e GOOGLE_APPLICATION_CREDENTIALS=/gcp/creds.json \
-v $HOME/.config/gcloud/application_default_credentials.json:/gcp/creds.json:ro \
gcr.io/datcom-ci/datacommons-data:VERSION
The version is latest or stable.
To verify that the data is correctly created in your Cloud SQL database, use the procedure in Inspect the Cloud SQL database above.
(Optional) Run the data management Docker container in schema update mode
If you have tried to start a container, and have received a SQL check failed error, this indicates that a database schema update is needed. You need to restart the data management container, and you can specify an additional, optional, flag, DATA_RUN_MODE to miminize the startup time.
To do so, add the following line to the above command:
docker run \
...
-e DATA_RUN_MODE=schemaupdate \
...
gcr.io/datcom-ci/datacommons-data:stable
Advanced setup (optional): Access Cloud data from a local services container
For testing purposes, if you wish to run the services Docker container locally but access the data in Google Cloud, use the following procedures.
Step 1: Set environment variables
To run a local instance of the services container, you will need to set all the environment variables, as described above in the custom_dc/env.list. You must also set the MAPS_API_KEY to your Maps API key.
Step 2: Generate credentials for Google Cloud default application
See the section above for procedures.
Step 3: Run the services Docker container
From the root directory of your repo, run the following command, assuming you are using a locally built image:
docker run -it \
--env-file $PWD/custom_dc/env.list \
-p 8080:8080 \
-e DEBUG=true \
-e GOOGLE_APPLICATION_CREDENTIALS=/gcp/creds.json \
-v $HOME/.config/gcloud/application_default_credentials.json:/gcp/creds.json:ro \
-v INPUT_DIRECTORY:INPUT_DIRECTORY \
-v OUTPUT_DIRECTORY:OUTPUT_DIRECTORY \
[-v $PWD/server/templates/custom_dc/custom:/workspace/server/templates/custom_dc/custom \]
[-v $PWD/static/custom_dc/custom:/workspace/static/custom_dc/custom \]
IMAGE_NAME:IMAGE_TAG
Page last updated: January 16, 2025 • Send feedback about this page